Keycloak Gatekeeperとは
Keycloak Gatekeeperは、認可リバースプロシキとして動作するGo言語で実装されたアプリケーションとなります。
元々あったKeycloak Security Proxyが非推奨となり、後継としてKeycloak Gatekeeperが開発されています。
Keycloak Gatekeeperを導入すると、保護対象アプリケーションに手を加える必要無いのが大きなメリットです。
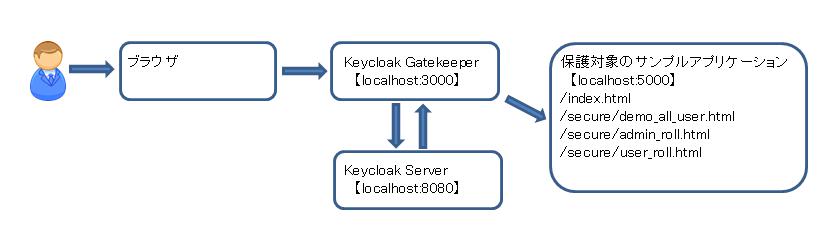
実行環境・構成
WindowsServer2016のローカル環境で構築
Keycloak 6.0.1 localhost:8080
Keycloak gatekeeper localhost:3000
保護対象のサンプルアプリ localhost:5000
ブラウザ:google chrome
Keycloakの概要
Keycloakの概要については、こちらの記事をご確認下さい。
↓
以下、Keycloak Gatekeeperの設定を行います。
Keycloakの設定
Keycloakの設定として、以下1.~6.を行います。
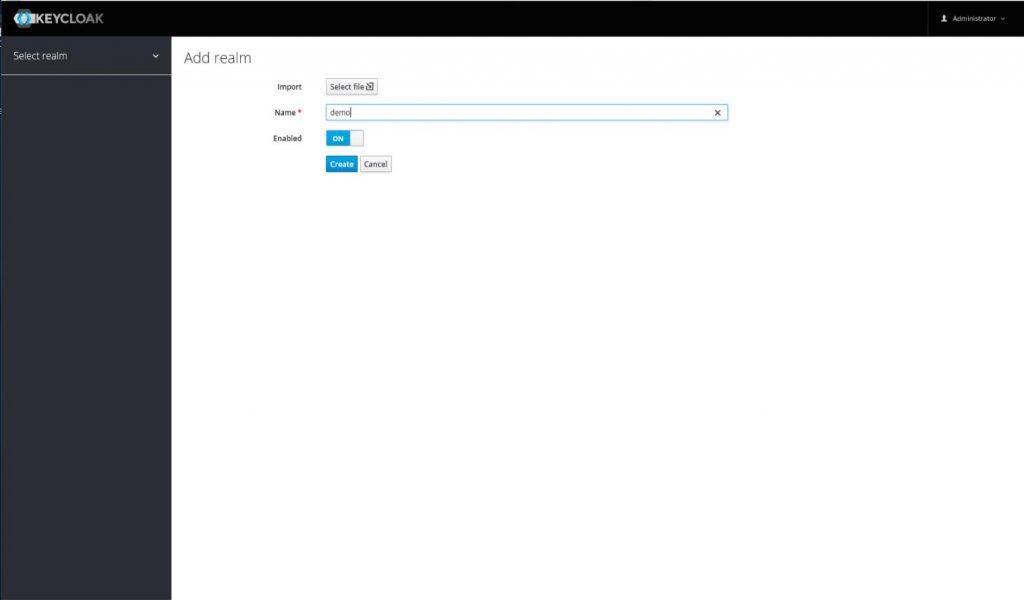
1.レルムを作成する。
2.ユーザーを作成する。(user001,admin001)
3.ロールを作成する。(user,admin)
4.ユーザーにロールを登録する。
5.Keycloak gatekeepwerを登録する。
6.mapperを登録する。(issu対策)
1.レルムを作成する。
Keycloak管理画面左上のドロップダウンとクリックし
add realmをクリック。
レルム:DEMOを作成。
2.ユーザーを作成する。(user001,admin001)
Keycloak管理画面左のUsersをクリックし、
画面右側のAdd userをクリック。
ユーザー名:user001で作成。
ユーザー作成後、credentialsタブをクリックし、
passowrdを設定、tmporaryをOFFにする。
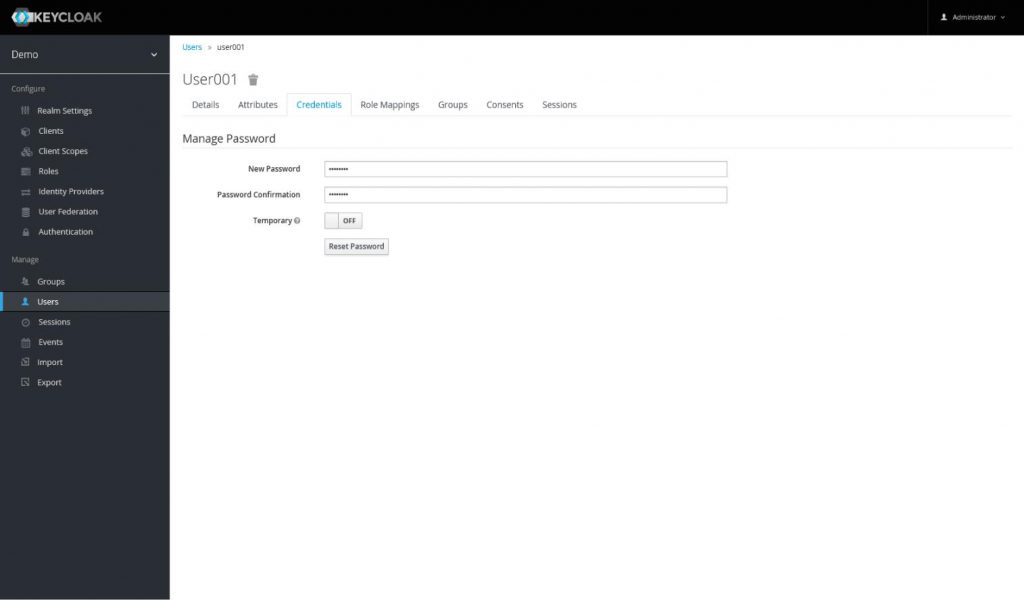
user001と同じ手順で、ユーザー名:admin001を作成。
3.ロールを作成する。(user,admin)
Keycloak管理画面左のRolesをクリックし、
右側のAdd Roleをクリック。
ロール名:userを作成。
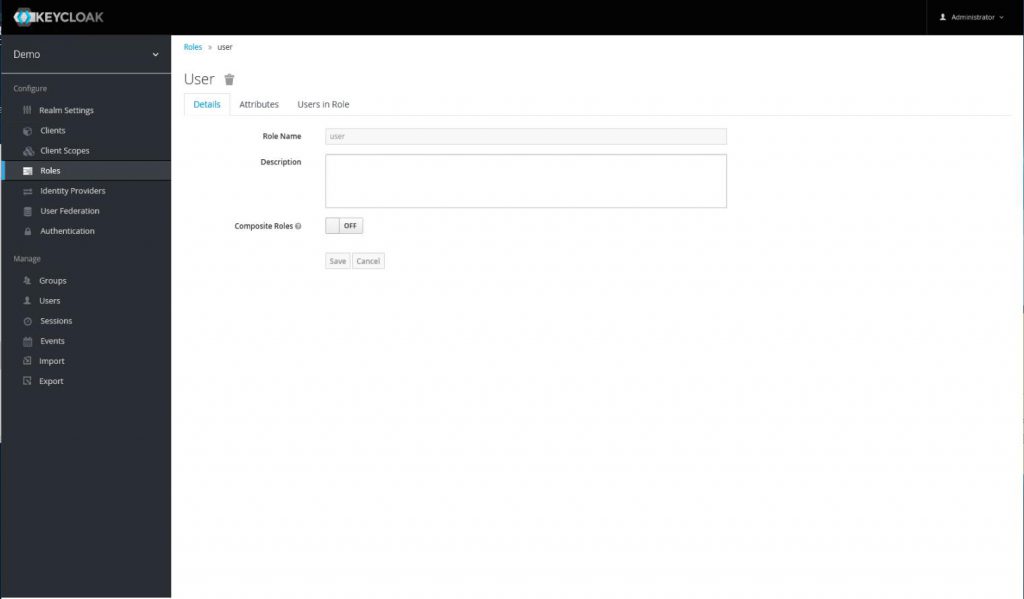
同じく、ロール名:adminを作成する。
4.ユーザーにロールを登録する。
Keycloak管理画面左のUsersをクリックし、
ロールに追加したいユーザーを選びます。
Role Mappingsタブをクリック。
追加したいロールをAvailable Rolesから選択し、
Add selectedボタンでロールを追加します。
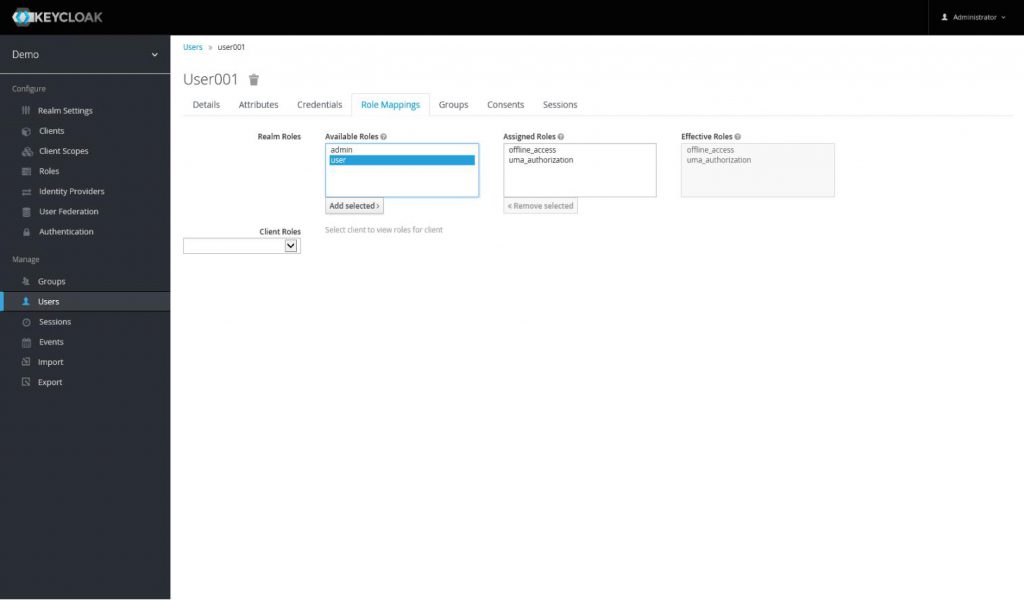
User001→userロールへ、
admin001→adminロールへ追加します。
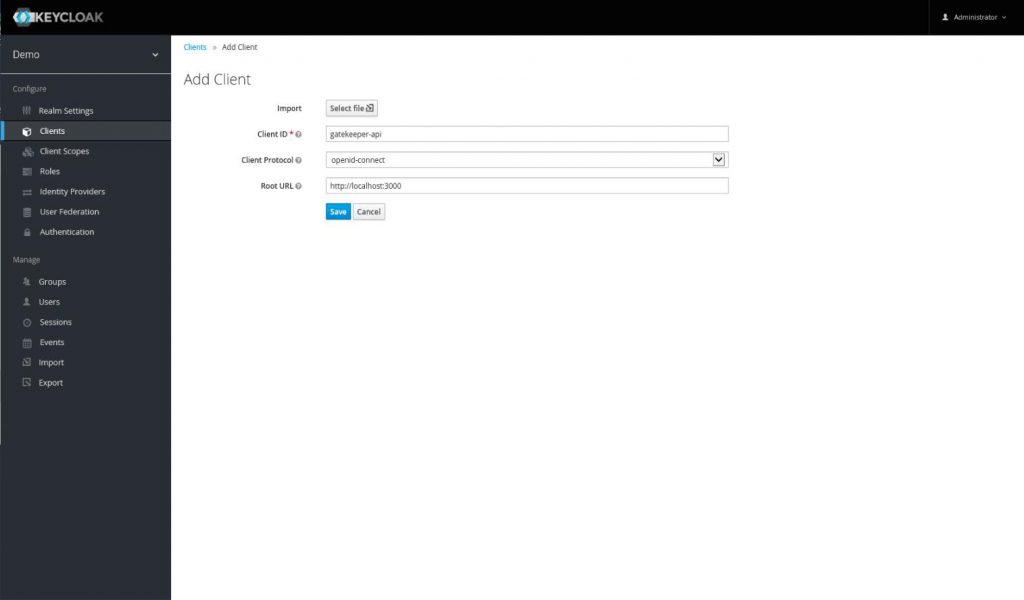
5.Keycloak Gatekeeperを登録する。
Keycloak管理画面左のclientsをクリックし、
画面右側のcreateボタンをクリック。
以下のように設定します。
Client ID:gatekeeper-api
Client Protocol:openid-connect
Root URL: http://localhost:3000
Access Type:confidential

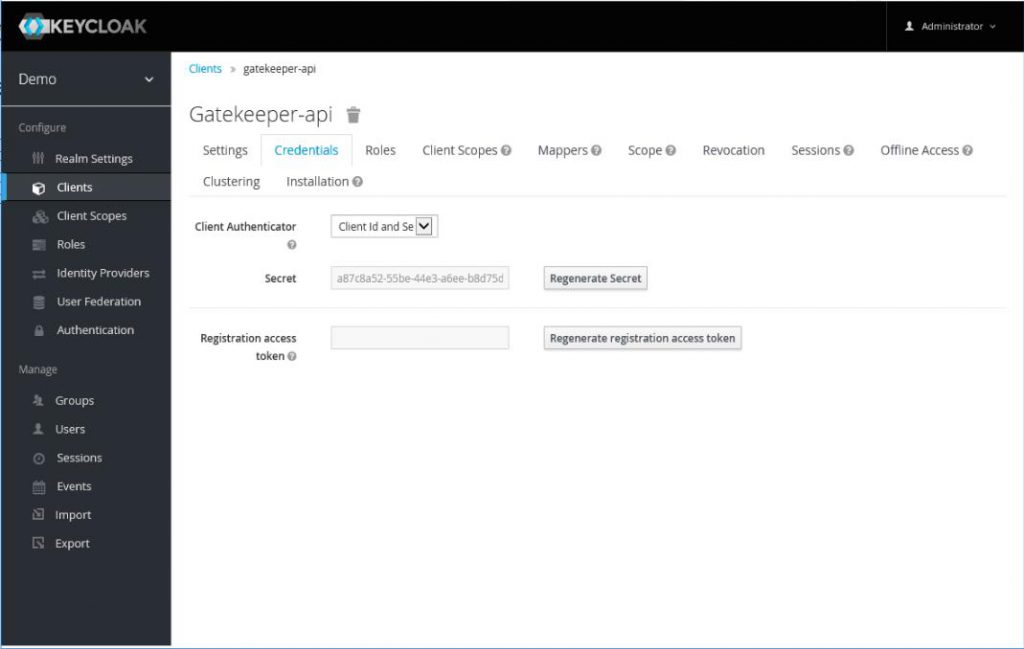
上記設定を保存すると、Credentialsタブが出現します。
Credentialsタブの Secretテキストボックスの文字列をメモします。
(以降のKeycloak Gatekeeper ymlファイル設定で必要。)
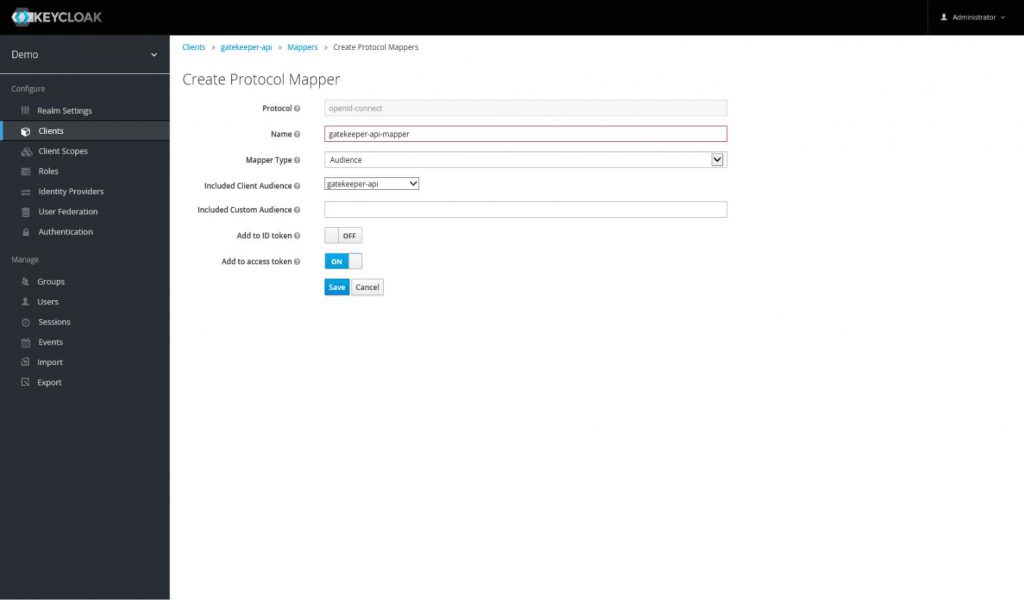
6.mapperを登録する。(issue対策)
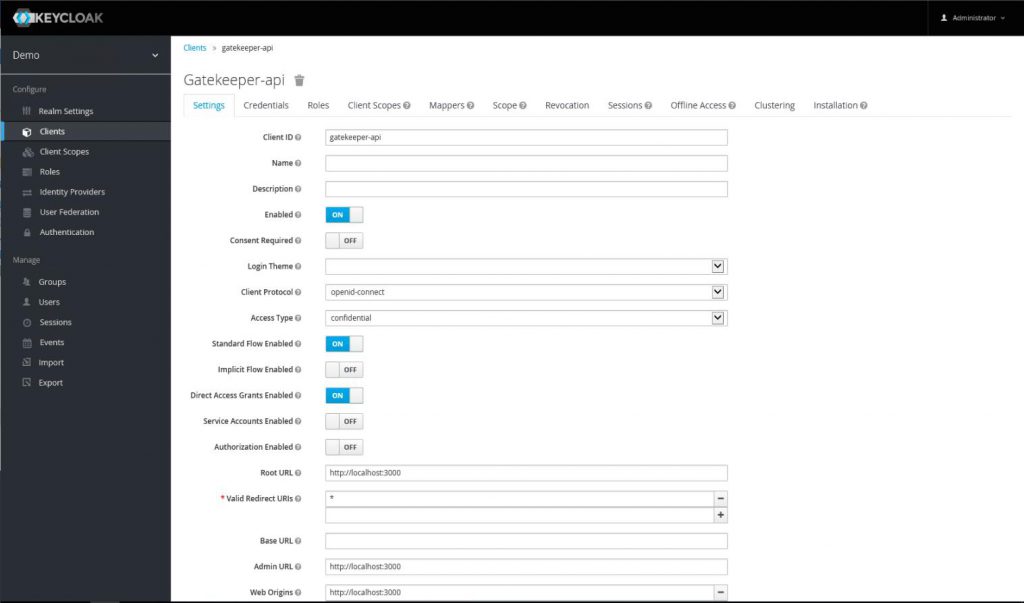
Keycloak管理画面左のclientsが選択、gatekeeper-apiを編集状態にします。
次にmapperを追加します。
mappersタブを選択し、画面右側createをクリック。
Mapper Type:Audience
Included Client Audience:gatekeeper-api(先ほど編集したclient)
※keycloak 6.0.1時点でも、公式ドキュメントに記載されており
Gatekeeperを動作させるのに上記mapperの追加が必要でした。
Keycloak Gatekeeperのダウンロード・設定
keycloak Gatekeeperの公式ドキュメントは以下にあります。
2.4. Keycloak Gatekeeper
https://www.keycloak.org/docs/latest/securing_apps/index.html
keycloak Gatekeeperは、以下よりWindows版 (keycloak-gatekeeper-windows-amd64.tar.gz) をダウンロードします。
https://www.keycloak.org/downloads.html
ダウンロードしたファイルは、tar.gz圧縮ファイルですが、
Powershellのtarコマンドで解凍可能です。
コマンド
ps>tar xvf .\keycloak-gatekeeper-windows-amd64.tar.gz
解凍すると、keycloak-gatekeeper.exeが生成されます。
このkeycloak-gatekeeper.exeを任意のフォルダに置きます。
keycloak-gatekeeper.exeファイルを置いたフォルダが、
Keycloak Gatekeeperの実行フォルダとなります。
例:C:\Users\<ユーザー名>\Documents\gatekeeper\keycloak-gatekeeper.exe
Keycloak gatekeeperの設定ファイルとし、以下のymlファイル(gatekeeper.yml)を作成し Keycloak-gatekeeperを置いたフォルダと同階層に配置します。
ファイル名:gatekeeper.yml
discovery-url: http://localhost:8080/auth/realms/demo
client-id: gatekeeper-api
client-secret: a87c8a52-55be-44e3-a6ee-b8d75d6f2888
listen: localhost:3000
enable-refresh-tokens: true
secure-cookie: false
redirection-url: http://localhost:3000
encryption-key: 3lKvZzSmAq8DoMYGPRkVfSQrF27GKCPF
upstream-url: http://localhost:5000
resources:
- uri: /index.html
white-listed: true
- uri: /secure/demo_all_user.html
methods:
- GET
- uri: /secure/user_roll.html
methods:
- GET
roles:
- user
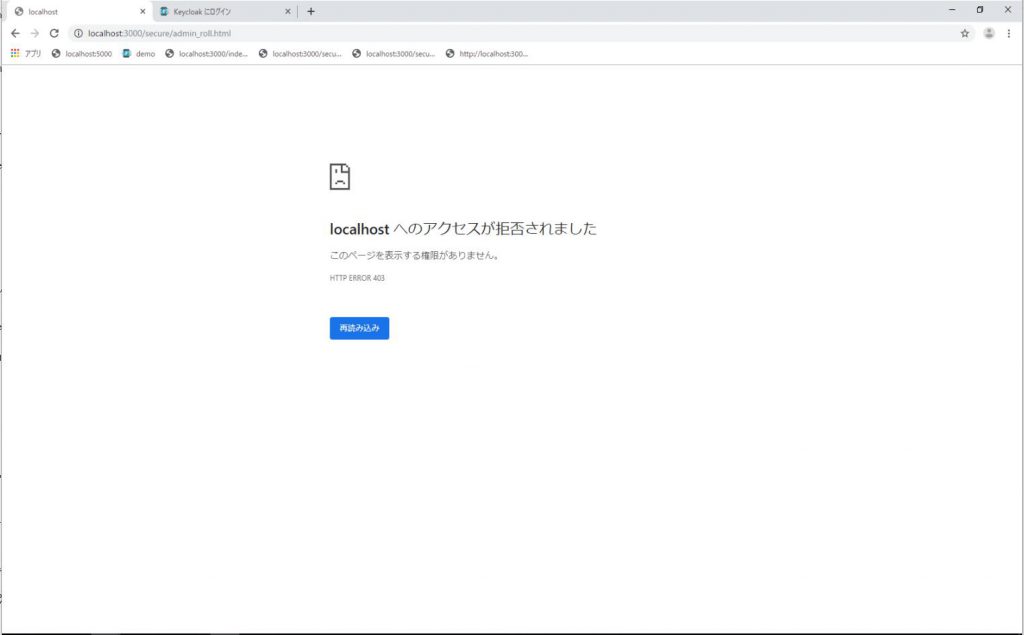
- uri: /secure/admin_roll.html
methods:
- GET
roles:
- admin
# discovery-url:KeycloakのRealmに対するエンドポイント
# client-id:作成したクライアントID
# client-secret:先ほどメモしたGatekeeper client Secret
# listen:Gatekeeperのポート
# secure-cookie … バックエンドがhttpsではない場合、falseにする(デフォルトtrue)
# redirection-url … OAuthのコールバックURLを指定。
# encryption-key … セッションの暗号化キー。
# upstream-url … バックエンドのURL
# 各リソースに対するアクセス設定です。今回は、以下のように設定しました。
# /index.html … 誰でもアクセス可(white-listed: true)
# /secure/demo_all_user.html … demoレルムでログインしていればアクセス可
# /secure/user_roll.html … userロールを持っていればアクセス可
# /secure/admin_roll.html … adminロールを持っていればアクセス可
# *を使用して配下を指定することも可能。 ( 例:/secure/* )保護対象のサンプルアプリケーション作成
保護対象のサンプルアプリケーションは、node.js上で動作するhtml表示アプリケーションを作成しました。
確認環境
WindowsServer2016、Windows10pro
node.js:v10.16.0
npm:6.9.0
実際に使用したサンプルアプリケーションのnode.js設定ファイル、htmlファイル一式をダウンロード可能です。
↓
https://github.com/git9fukanubsawa/keycloak_gatekeeper_nodejs
使い方は、ダウンロードしたzip圧縮ファイルを任意のフォルダで解凍・設置します。
(C:\Users\<ユーザー名>\Documentsで解凍)
以下のように、【npm start】コマンドを実行。
C:\Users\<ユーザー名>\Documents>cd keycloak_gatekeeper_nodejs

C:\Users\<ユーザー名>\Documents\keycloak_gatekeeper_nodejs>npm start

> keycloak_gatekeeper_nodejs@0.1.0 start C:\Users\Administrator\Documents\keycloak_gatekeeper_nodejs
> node index.js

[Thu Jun 06 2019 16:47:07 GMT+0900 (GMT+09:00)]_localhost:5000_Server running
http://localhost:5000/index.htmlにアクセスすると以下のようなページが表示されます。(リンクをクリックすると画面遷移します。)

参考:フォルダ構成
C:\Users\\Documents\keycloak_gatekeeper_nodejs\htmldir\
│  index.html
│
└─secure
        admin_roll.html
        demo_all_user.html
        user_roll.html
Keycloak gatekeeperの動作確認
Keycloak本体が起動している状態で、gatekeeper.ymlをオプションとして渡しkeycloak-Gatekeeperを起動します。
C:\Users\\Documents\gatekeeper>keycloak-gatekeeper.exe --config gatekeeper.yml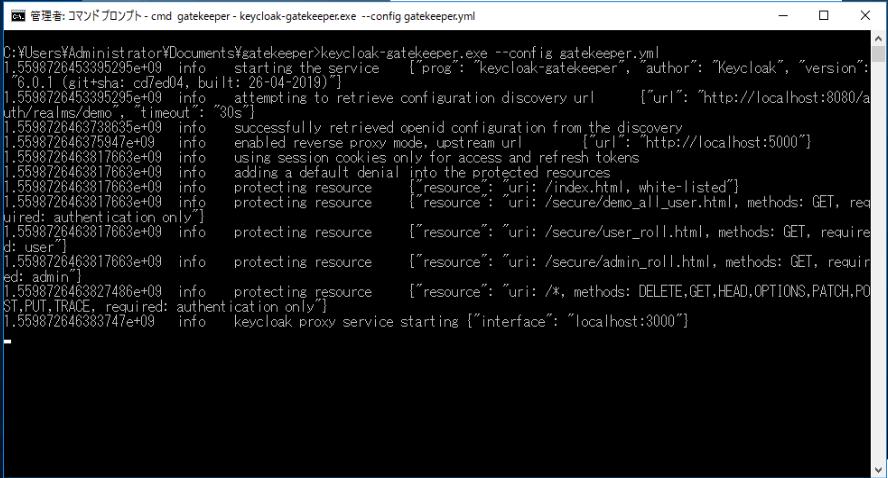
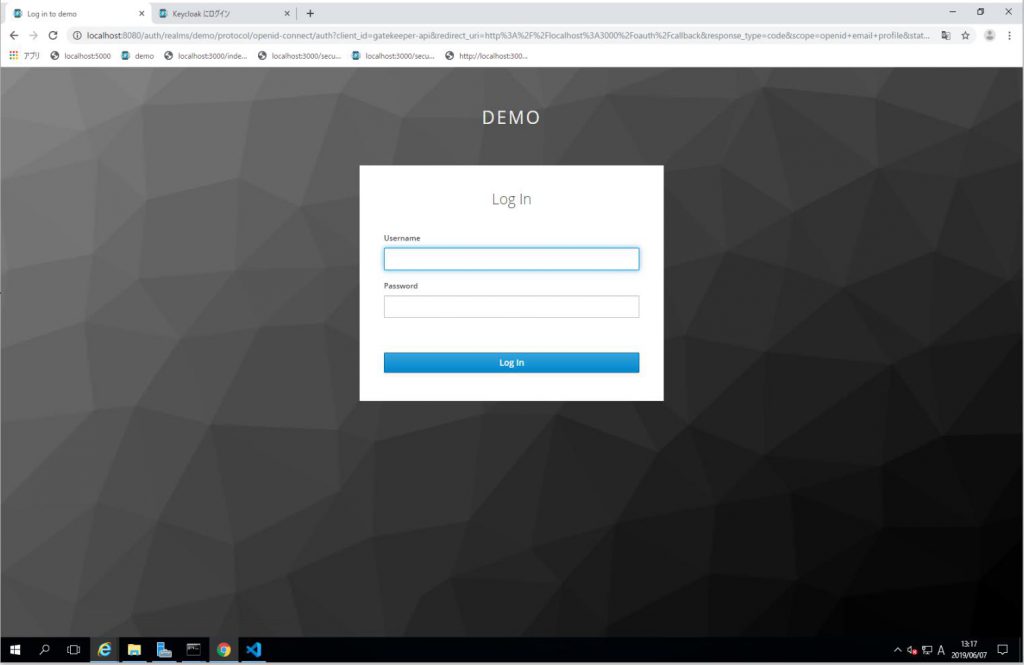
google Cherome ブラウザで、http://localhost:3000/index.htmlを開く。
ページのリンクをクリックすることにより画面遷移します。
動作としては以下の通りです。
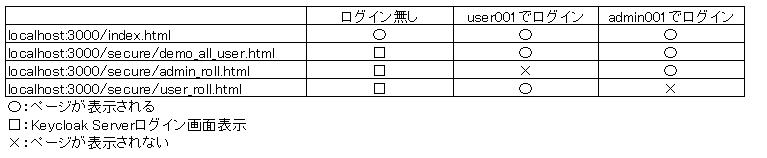
〇:htmlページが表示される。

□:Keycloak Serverログイン画面が表示される。
×:ページが表示されない
×Keycloak Gatekeeper まとめ
・レルム、ユーザー、ロールの作成
・Keycloak Serverの設定
・Keycloak Gatekeeperの設定
案外設定項目も少なく、簡単にプロキシ型認証が設定出来ました。
以下の記事を参考にさせて頂きました。
https://kazuhira-r.hatenablog.com/entry/2019/02/23/194727
https://qiita.com/k2n/items/635e0b08ecac421c56d2